Eggplant (Solanum melongena esculentum) is a tender perennial plant of the nightshade family (Solanaceae). It is erect, bushy with stem sometimes armed with few spikes. Its leaves are large, ovate and slightly lobed. The shape and color of fruits depend on the variety.
Eggplant is extensively grown in the eastern and southern Asia and in the Philippines, it is one of the most important vegetables. Its young fruits may be roasted, fried stuffed, cooked as curry, pickled or prepared with other vegetables as the popular Ilocano dishes, pinakbet and dinengdeng. This vegetable is a good source of potassium, iron, protein and Vitamins A and B. It is naturally low in calories and no fat. Eggplant skin is called “nasunin”. Nasunin is a potent antioxidant and free radical scavenger that has been shown to protect all membranes from damage.
Eggplant production accounts for 28 percent of the total volume of top vegetables grown in the country. Its value is the highest among the leading vegetables. The area devoted to eggplant production is more than 20,000 hectares with small farms ranging from 0.5 to 2.0 hectares in size. The average yield of eggplant per hectare in the Philippines is 9.95 tons, which is about half of the average yield in Asia and the world.
Your Guide in Eggplant Production
SOIL AND CLIMATIC REQUIREMENTS
The crop thrives best in sandy loam and clay loam textured soils with pH value ranging from 5.5 to 6.8. The water requirement of the crop is 35 to 40 millimeter per week.
It is moderately sensitive to flooding and moisture sensitive during flowering and fruit enlarging. Eggplant requires a temperature of 20o to 30oC during seed germination, 24o to 32oC soil temperature and 21o to 30oC during its growth duration.
CULTURAL MANAGEMENT PRACTICES
Selection of Varieties
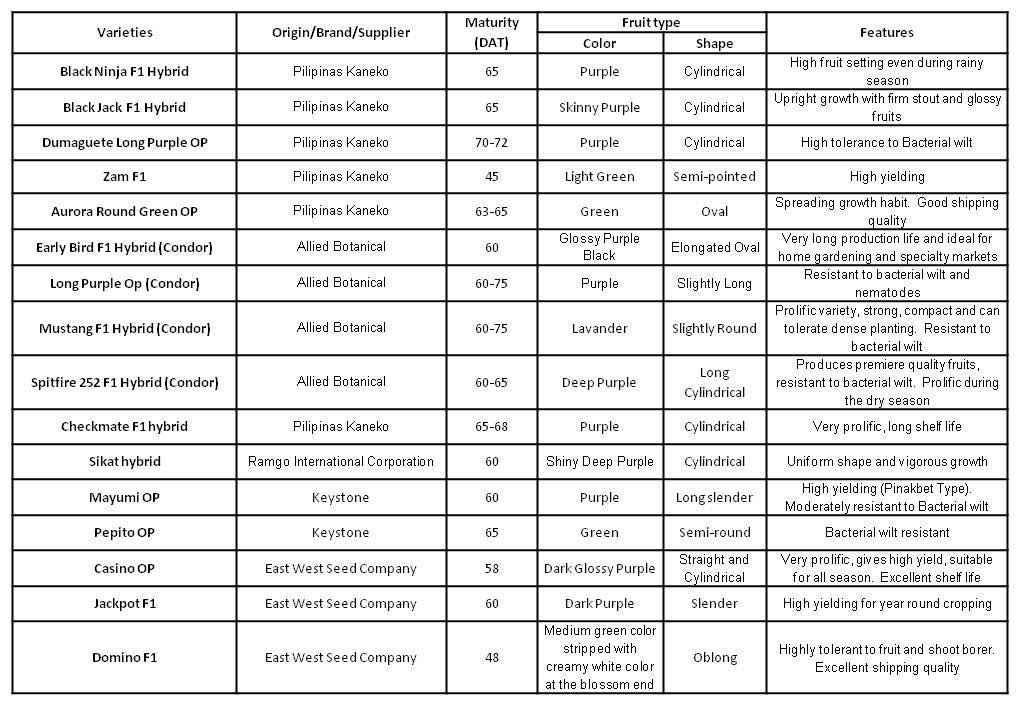
Select varieties that are high yielding, resistant to insect pests and diseases, non-seasonal, adapted to local climatic conditions and acceptable to the consumers to gain optimum yield and profit. Several improved varieties are listed in the brochure Guide in Selecting Lowland Vegetable Varieties included in this kit for your reference.
Land Preparation
- Prepare the field as early as possible to give enough time for the weeds and stubbles of previous crops to decompose. Plow and harrow 2 to 3 times alternately at one week interval. Plow at a depth of 15 to 20 cm. Harrow twice to break the clods and level the field. A well-pulverized soil promotes good soil aeration and enhances root formation.
Raising Seedlings
Ahectare of farm requires 100 g of seeds. One gram is approximately 250 seeds. There are two methods of seedling establishment in eggplant, namely, the seedbed method and the box, tray or potlets method.
Seedbed Method
- Choose a level area fully exposed to sunlight, accessible to water source, with good drainage and provided with windbreaks.
- Prepare the area by plowing and harrowing alternately until the soil is reduced to fine tilth.
- For one (1) hectare area to be planted, construct seedbed measuring 1 x10 m at 15 cm high.
- Pulverize the soil and level the bed with the use of hand tools and remove weeds and stubbles.
- Before sowing the seeds, sterilize the seedbed to kill weed seeds and pathogens present in the soil.
- Water the prepared seedbed first for better heat penetration.
- Spread about 3 to 5 cm thick of either rice straw or rice hull on top of the seedbeds and burn slowly.
- When the soil cools, remove unburned materials and excess ash.
- To avoid toxic effects of burned materials, do not sow seeds immediately after sterilization. Water the seedbeds before sowing.
- Prepare rows at a distance of 5 cm with the use of a stick.
- The night before sowing, soak the required amount of seeds in clean water. Sow immediately or air dry the seeds before sowing. Drill the seed evenly in the furrows and lightly cover with fine soil.
Seedling Tray/Potlets Method
Raising seedlings in tray or potlets requires less seeds, promotes uniform growth of superior seedlings, minimizes transplanting shock and lessens seedling mortality. It also saves labor for thinning, weeding, watering, and pest management. Prepare the sowing medium by mixing thoroughly one (1) part compost, one part carbonized rice hull (CRH), and one part garden soil. Sterilize the garden soil by roasting or drenching with boiling water before mixing with other medium.
Fill holes of the tray or potlets with the medium and slightly compact it using your palm. Use a seedling tray with 100 or 104 holes. The volume of medium in each hole contains enough nutrients to sustain the seedling until transplanting. The night before sowing, soak the required amount of seeds in clean water. Sow immediately or air dry the seeds before sowing. Sow one seed per hole of the seedling tray at a depth of 0.5 cm. Cover the seeds with fine soil. Sprinkle with water.
Care of Seedlings
Protect the seedlings from excessive sunlight and rain by providing a temporary shade using available indigenous materials such as plastic, cogon, talahib or coconut leaves. Construct the shade to 120 cm high on the east side and about 60 cm high on the west side.
Water the seedlings preferably in the morning to minimize damping off. The amount of water to be applied should be just enough to keep the soil moist. Over watering favors damping-off and production of weak seedlings.
Drench the seedlings with starter solution of one tbsp urea (45-0-0) or one tbsp of ammonium sulfate (21-0-0) dissolved in four (4) liters of water 10 days after emergence. Water the seedlings immediately after applying fertilizer to prevent leaf injury.
One week before transplanting, harden the seedlings by gradually exposing them to sunlight, and withholding water. For the first day, expose the seedlings up to 10 o’clock in the morning and increase duration everyday until the seedlings can withstand the heat of the sun the whole day. However, make sure that the seedlings do not wilt severely. Gradually reduce the amount of water and frequency of watering to enhance hardening of seedlings. Hardening is done to prepare the seedlings to field conditions.
Construction of Planting Beds and Furrows
- When using plastic mulch, construct 1 m wide beds raised at 20 cm height. Space the beds 0.5 m apart which serve as path for manual watering and furrow irrigation.
- For the conventional method, set furrows (dry months) or ridges (rainy months) 1.0 m apart.
Mulching
Mulching controls weeds, preserves soil moisture, prevents soil erosion and leaching of fertilizers, and reflects sunlight to repel insect pests hiding under the leaves. Materials that can be used for mulching include coconut choir dust, rice straw, rice hull, and plastic mulch. Apply the coconut choir dust, rice straw and rice hull mulches after hilling up at 3 to 5 cm thick. The use of plastic mulch is an improved technology in vegetable production. lace the plastic mulch before transplanting.
Placing the plastic mulch:
- Stretch the plastic mulch over the planting bed, with the silver color on top.
- Fasten the edges of the plastic mulch to the soil with bamboo slats spaced 30 cm apart (6 to 8 cm long). If bamboo slats are not available, cover its edges with soil using a shovel or rake, or by passing a moldboard plow near the edges.
Making the planting holes:
- Measure 0.5 m planting distance 10 cm from the edge on both sides of the plastic mulch and mark the spots.
- Make the holes following any of these three ways:
- Using a serrated – lipped tin can – Cut the lip of a 7 to 10 cm diameter tin can with metal scissor to form 1-cm long saw-like edges. Push the can on the marked planting spots of the plastic sheet, serrated side down.
- Using a hot tin can – Punch small holes using a nail at the sides and bottom of a 7 to 10 cm diameter tin can. Attach a wooden or bamboo handle. Fill the can with burning charcoal. The holes ventilate the charcoal to keep it burning. Push the tin can with the heated bottom on the marked planting spots of the plastic sheets.
- Using a cutter – Cut intersecting lines at 7-10 cm long to form “+” or “X” at the marked planting spots. During transplanting, fold up the 4 flaps to form square planting holes.
Fertilizer Application
The quantity and kind of fertilizer to be applied depend on the soil fertility and on the previous cropping patterns based on the result of the soil analysis. In the absence of soil analysis, use the following recommended rates:
a. With plastic mulch
Basal
Apply the following fertilizers on both sides of the bed every 10 linear meters of the planting row:
- 0.5 kg Process Chicken Manure or any commercial organic fertilizer
- 0.4 kg ammonium phosphate (16-20-0)
- 0.4 kg ammonium sulfate (21-0-0)
- 0.1 kg muriate of potash (0-0-60)
Cover the fertilizers with soil, or mix them thoroughly with the soil.
Sidedess
b. Conventional method (unmulched)
Basal
Apply 0.5 kg fully decomposed chicken manure or any commercial organic fertilizer and 0.4 kg ammonium phosphate (16-20-0) for every 10 linear meters of the planting furrows or ridges.
Sidedress
Either dibble the fertilizer at the midpoint (25cm) between plants along the rows, or distribute it evenly in a shallow furrow at 20 cm away from the base of the plant. Follow this recommended schedule,source and amount of fertilizers:
Transplanting
Eggplant is ready for transplanting 4 to 6 weeks from sowing. Pull seedlings carefully. Do not remove soil adhering to the roots. Seedlings recover easily, provided root damage during pulling is minimal. For conventional method of planting, at transplanting time make furrows at a distance of 100 cm between rows for single row. However most farmers prefer double row since it provides developing fruits adequate protection against sun scalding. It also facilitates farm operations.
Double row is spaced 50 cm between two adjacent rows and 150 cm between double rows. For beds with plastic mulch, remove the soil and transplant seedlings directly to the holes prepared on the plastic sheets. Transplant 30 to 35 day-old seedlings which should now have 3 to 4 true leaves. Transplant only one seedling per hole per hill. Transplant during cloudy days or late in the afternoon to avoid transplanting shock. Replant missing hills or wilted plants at 3 to 5 days after transplanting (DAT). Water the newly transplanted seedlings immediately.
Irrigation
- For beds with plastic mulch, flood the beds two days before transplanting to cool down the soil under the plastic mulch and dissolve the fertilizers applied.
- For the conventional method, irrigate the furrows to dissolve the fertilizers applied and minimize direct contact of the seedling roots with the fertilizers. During the dry season, irrigate at 7, 21 and 30 DAT. Irrigate every 10 days thereafter. The mulched eggplant requires less irrigation water. During the wet season, irrigate as the need arises. Irrigate after every fertilizer application.
Weeding
In unmulched fields, manage weeds by hand-weeding or off-barring at 14 DAT and by hilling-up at 21 DAT.
Pruning
Pruning is necessary for plant growth and fruit development. Remove lateral branches below the split except the branch nearest to the split (X branch). This allows the air to move freely on the base of the plants and minimize occurrence of fungus and bacterial diseases. Pruning unnecessary leaves also reduce competition in nutrient absorption.
Harvest and Postharvest Handling
Harvesting starts 46 to 50 DAT, depending on the variety and intended use of the fruits. Harvest fruits that are still tender and young. Harvest early in the morning and protect the fruits from the sun, rain,and mechanical damage. Harvest all fruits from the plants to prolong the fruiting period of the crop.
Harvesting is usually done two times a week. Use pruning sheer in harvesting to avoid damaging the plants. Remove damaged fruits from the harvest and sort according to market standards. Pack fruits in plastic bags. Prick the bags with a pin for ventilation. Allot two pricks per kilogram of packed fruits. For some varieties, the fruits can be stored up to five days under this condition.
Source: http://e-extension.gov.ph
